


PHILIPS MONITOR 28" 288E2A IPS UHD 4K LED SPK HDMI x 2 DP
 Bizgram Asia Pte Ltd
Address:
1 Rochor Canal Road #05-50 Sim Lim Square 188504
Singapore.
63341373
sales@bizgram.com
Frequently bought together:


Introduction
When it comes to clarity and detail the 3840 x 2160 (‘4K’ UHD) resolution on a 27 – 28” screen can be very attractive. The Philips 288E2UAE (288E2E) offers this pixel-dense experience, coupling it with a colour-focused IPS-type panel. Although not a ‘gaming monitor’, strictly speaking, the monitor is designed to accommodate 60Hz gaming. With support for Adaptive-Sync, including AMD FreeSync. We put this model through its paces in our usual suite of ‘real world’ tests.
Specifications
The monitor uses a 28” IPS (In-Plane Switching) type panel from Innolux. Or AAS (Azimuthal Anchoring Switch) as Innolux refers to it. This includes a 60Hz refresh rate with support for 10-bit colour (8-bit + FRC dithering). A 4ms grey to grey response time is specified, but as usual you should be sceptical of such figures. Some of the key ‘talking points’ for this monitor have been highlighted in blue below, for your reading convenience.
*10-bit can be selected in the graphics driver when using DP at any refresh rate, up to the native resolution. 10-bit and 12-bit can be selected when using HDMI at up to 30Hz for the native resolution. Or at up to 60Hz for lower resolutions such as WQHD and Full HD. 12-bit includes an additional 2-bit dithering stage added by the monitors scaler.
Features and aesthetics
The monitor has a homely-looking square design. The stand base is a rectangular ring, matte black plastic with a brushed texture. The bottom bezel is matte black plastic, ~15mm (0.59 inches) thick with just a sliver of panel border. The top and side bezels are dual-stage, including a slim panel border flush with the rest of the screen and a slim hard plastic outer component. Including both components the bezels are ~6.5mm (0.26 inches) at the top and ~7.5mm (0.30 inches) at the sides. The screen has a light to very light matte anti-glare finish, explored shortly.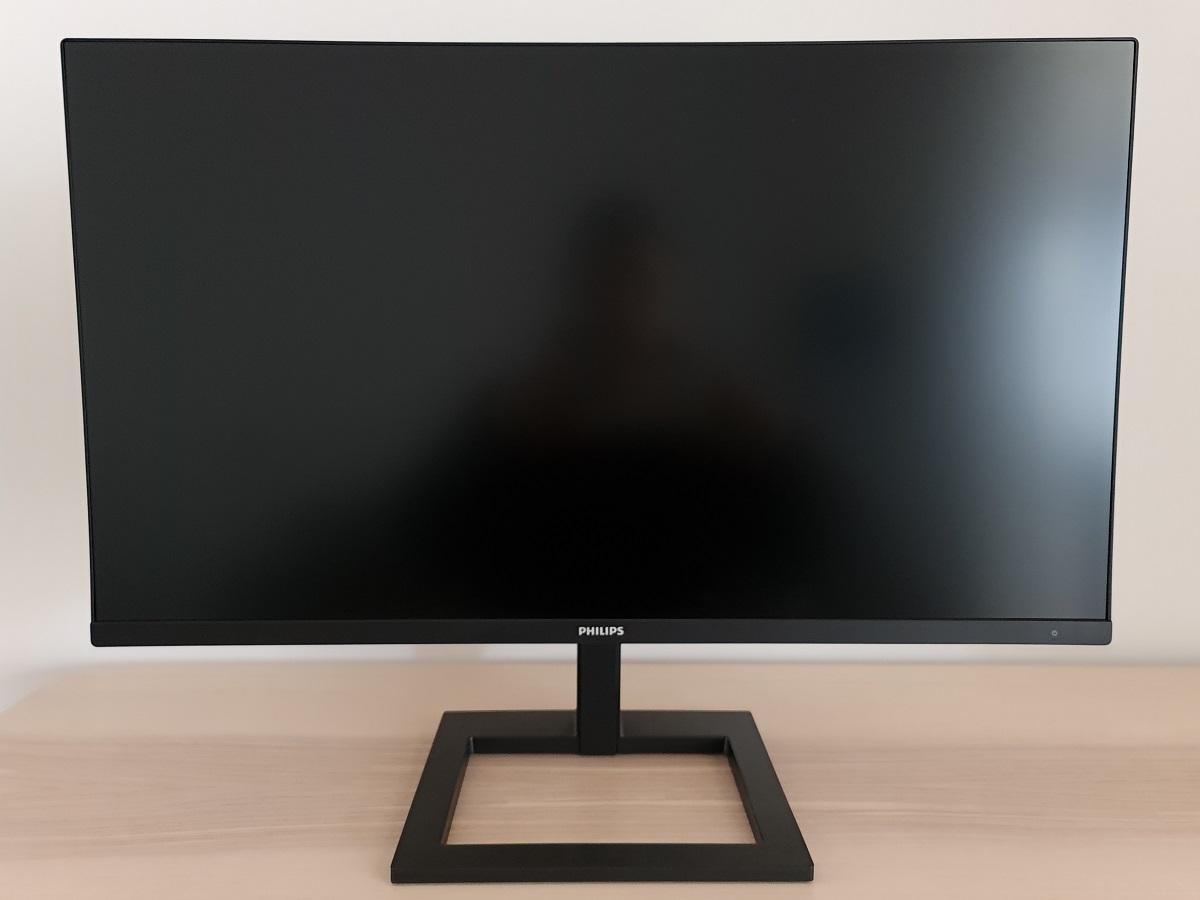
The OSD is controlled by a joystick at the rear of the monitor, towards the right side as viewed from the front. A small pinprick-style power LED faces forwards towards the right side of the bottom bezel. Glowing a fairly gentle white when the monitor is on and flashing white when it enters a low power state. The following video runs through the menu system and OSD controls, including the 2-device PiP and PbP functionality.
From the side the monitor is slim at thinnest point, ~14mm (0.55 inches). The monitor bulks out lower down where the stand attaches. The included stand offers tilt (5° forwards, 20° backwards) and height (100mm or 3.94 inches) adjustment. At lowest stand height, the monitor sits ~26mm (1.02 inches) above the desk surface with the top of the screen ~393mm (15.47 inches) above the desk. The total depth of the monitor – including the integrated cable tidy feature at the back – is ~233mm (9.17 inches), with the screen sitting ~80mm (3.15 inches) back from the front edge of the screen. So you can place the screen reasonably close to the wall if you want.
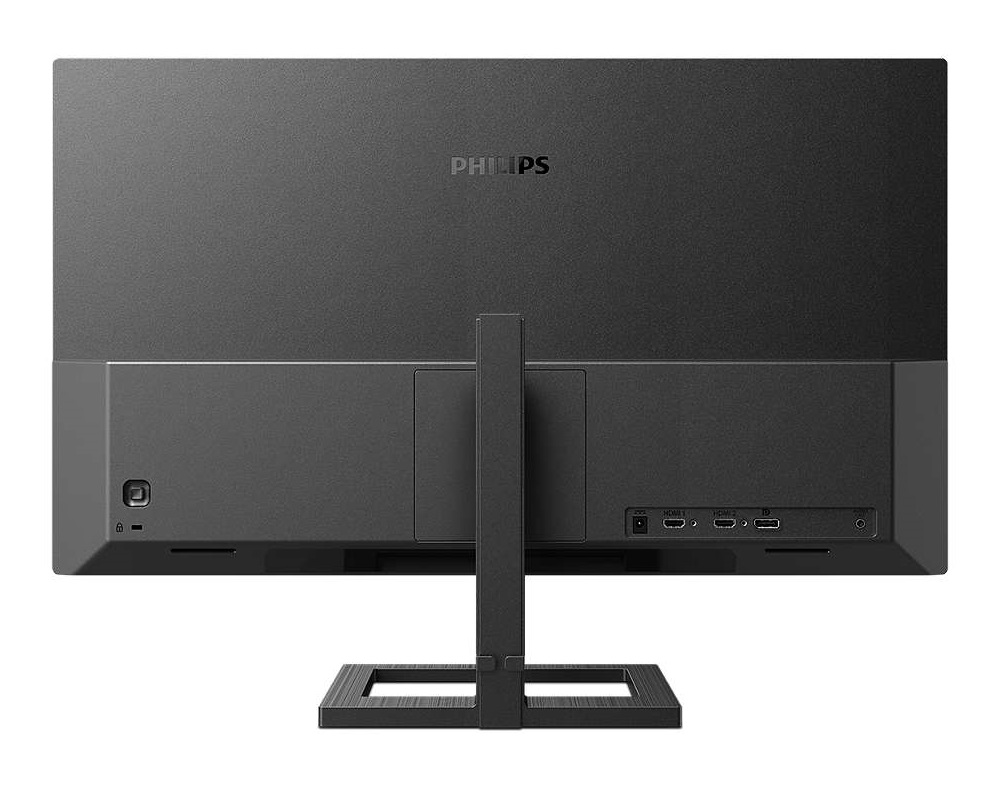
The rear of the monitor makes extensive use of matte black plastic. The stand attaches using a quick release mechanism, detachable by pushing up a switch beneath the attachment point. This reveals 100 x 100mm VESA holes for alternative mounting. A K-Slot is located beneath the OSD joystick, to the left. The ports are found towards the right in a recessed area and include; DC power (external ‘power brick’), HDMI 2.0, DP 1.2a and a 3.5mm audio output. The ‘E2UAE’ model includes 4 USB 3.2 ports (yellow coloured supporting BC 1.2 fast-charging) plus upstream. It also includes 2 x 3W backwards-facing speakers near the bottom of the screen. These offer basic sound output, with reasonable volume but not a particularly rich or crisp sound. A bit fuller than the output of some integrated speakers but far from the best we’ve heard. The ‘E2E’ model includes an additional HDMI 2.0 port but offers no USB functionality or integrated speakers. In some regions a 288E2A variant is available with tilt-only stand, 2 HDMI 2.0 ports, an audio input and speakers but no USB ports.
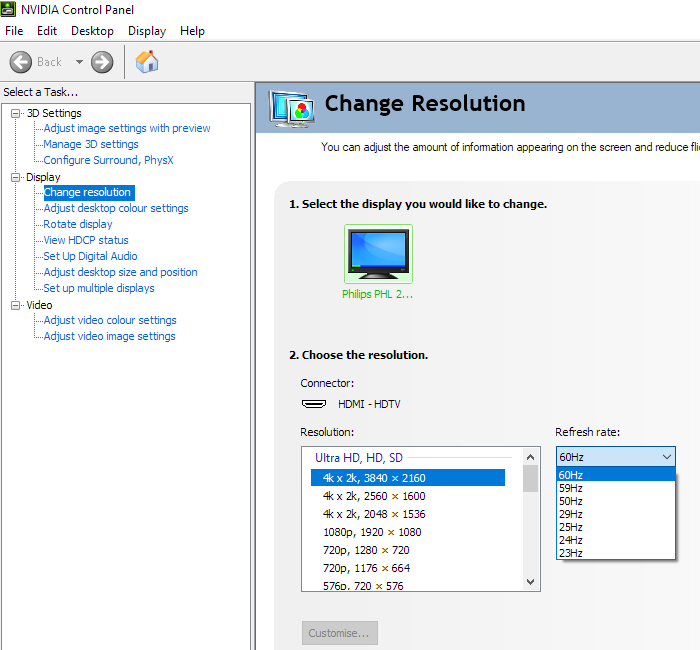
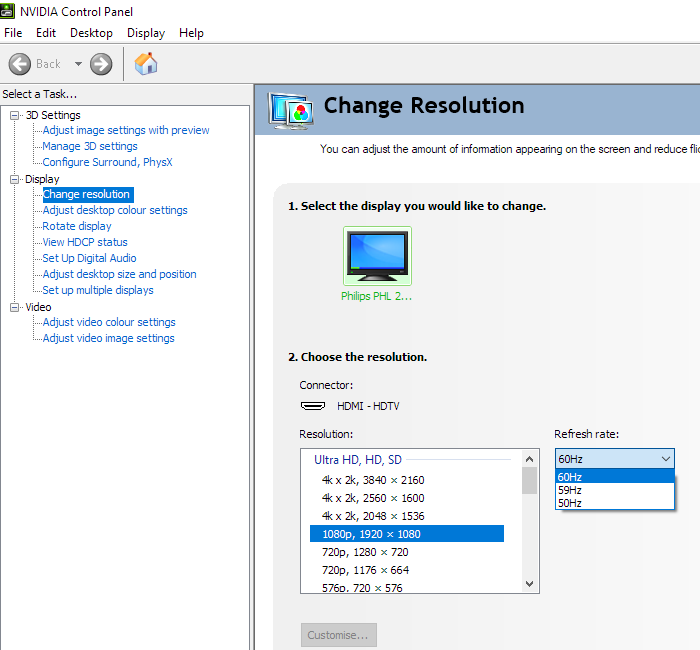
3840 x 2160 @60Hz can be leveraged using suitable versions of HDMI and DP. Adaptive-Sync is supported via AMD FreeSync (HDMI and DP) and Nvidia’s ‘G-SYNC Compatible Mode’ (DP). A power cable and adaptor plus HDMI cable is included as standard. A DP cable is also included with the ‘E2UAE’. Additional accessories depend on region. The first image below shows the refresh rates supported for the native 3840 x 2160 (‘4K’ UHD) and indeed lower resolutions including 2560 x 1440 (WQHD) and 1920 x 1080 (Full HD) when using DisplayPort. These refresh rates are also supported for the ‘4K’ UHD resolution via HDMI – they’re categorised in the EDID of the monitor as ‘PC’ resolutions. 60Hz but not 30Hz is listed for WQHD via HDMI. Additional refresh rates are supported via HDMI and categorised in the EDID as ‘TV’ resolutions. Nvidia Control Panel lists these as ‘Ultra HD, HD, SD’ and they can be accessed by other devices such as the PS5 and Xbox Series X. The second image shows these for the ‘4K’ UHD resolution and the third image for the Full HD resolution.
Calibration
Subpixel layout and screen surface
The image below is a macro photograph taken on Notepad with ClearType disabled. The letters ‘PCM’ are typed out to help highlight any potential text rendering issues related to unusual subpixel structure, whilst the white space more clearly shows the actual subpixel layout alongside a rough indication of screen surface. This model uses a light to very light matte anti-glare screen surface. This offers reasonable glare handling, whilst offering fairly direct emission of light. There isn’t a clear layered appearance in front of the image, whilst vibrancy and clarity is better maintained than on stronger matte surfaces. In brighter conditions, light striking the screen surface can give a ‘glassy’ look when observing some content. But the glare handling is far superior to a glossy surface or even lighter matte screen surfaces. The screen surface texture is not as smooth as it could be, giving lighter content a bit of a grainy look. Not the sort of heavily sanded look we’ve seen on some models, but not the smoothest look either. Most users should find this level of graininess fine or simply not really notice.![]()
As shown above the standard RGB (Red, Green and Blue) stripe subpixel layout is used. This is the default expected by modern operating systems such as Microsoft Windows. Apple’s MacOS no longer uses subpixel rendering and therefore doesn’t optimise text for one particular subpixel layout to the detriment of another. You needn’t worry about text fringing from non-standard subpixel layouts and won’t need to change the defaults in the ‘ClearType Text Tuner’ as a Windows user. You may still wish to run through the ClearType wizard and adjust according to preferences, however. The subpixels are quite ‘squat’ with relatively large gaps above and below. On some models this contributes to ‘static interlace pattern artifacts’ and can affect text and fine-edge clarity. On this model we observed no such issues, likely as the pixel density is so high that the gaps above and below the subpixels are still tiny. We therefore had no subpixel-related concerns related to sharpness or text clarity on this model.
Testing the presets
The 288E2UAE (288E2E) features a range of ‘SmartImage’ presets; ‘FPS’, ‘RTS’, ‘Gamer1’, ‘Gamer2’, ‘LowBlue Mode’, ‘EasyRead’ and ‘SmartUniformity’. Many of these presets simply adjust various settings in the OSD and don’t achieve anything you couldn’t achieve yourself with manual adjustment. A notable exception is ‘SmartUniformity’, explored here alongside a range of other manual adjustments. And ‘Easy Read’ which turns everything greyscale. All presets except ‘Easy Read’ and ‘Off’ unlock the ‘SmartFrame’ feature which allows a section of the screen to be highlighted with different digital brightness and contrast levels. The ‘Gamer 1’ and ‘Gamer 2’ presets allow full flexibility and allow you to easily recall different sets of settings. We touch upon the presets briefly in the OSD video but for this section will mainly be focusing on various manual adjustments, the ‘LowBlue Mode’ settings and the ‘SmartUniformity’ setting. The table below includes gamma and white point readings taken using a Datacolor SpyderX Elite colorimeter. General observations on the image are also provided.
Our test system uses Windows 10 and an Nvidia RTX 3090 connected using a DP cable. Additional testing was performed with an AMD Radeon RX 580 and also using HDMI, but our observations on this table were not significantly affected by this. An important step also had to be performed in the graphics driver if connected to an Nvidia GPU via HDMI. The colour signal had to be corrected to a ‘Full Range RGB’ signal as detailed in this article. No additional monitor drivers or ICC profiles were specifically loaded. The monitor was left to run for over 2 hours before readings were taken or observations made. Aside from our ‘Test Settings’ where various adjustments are made, assume factory defaults are used. An exception was that we disabled ‘DPS’ (Dynamic Power Saving) for consistency, a setting which dims the screen slightly when mostly dark content is displayed. When viewing the figures in this table, note that for most PC users ‘6500K’ for white point and ‘2.2’ for gamma are good targets to aim for. Individual targets depend on individual uses, tastes and the lighting environment, however.
Technical Details:
| Seller SKU: | PHI-288E2A |
|---|---|
| Origin: | Singapore |
| Minimum order quantity: | 1 |
| Date first listed on Sim Lim Square: | Mar 21, 2022 |
Introduction
When it comes to clarity and detail the 3840 x 2160 (‘4K’ UHD) resolution on a 27 – 28” screen can be very attractive. The Philips 288E2UAE (288E2E) offers this pixel-dense experience, coupling it with a colour-focused IPS-type panel. Although not a ‘gaming monitor’, strictly speaking, the monitor is designed to accommodate 60Hz gaming. With support for Adaptive-Sync, including AMD FreeSync. We put this model through its paces in our usual suite of ‘real world’ tests.
Specifications
The monitor uses a 28” IPS (In-Plane Switching) type panel from Innolux. Or AAS (Azimuthal Anchoring Switch) as Innolux refers to it. This includes a 60Hz refresh rate with support for 10-bit colour (8-bit + FRC dithering). A 4ms grey to grey response time is specified, but as usual you should be sceptical of such figures. Some of the key ‘talking points’ for this monitor have been highlighted in blue below, for your reading convenience.
*10-bit can be selected in the graphics driver when using DP at any refresh rate, up to the native resolution. 10-bit and 12-bit can be selected when using HDMI at up to 30Hz for the native resolution. Or at up to 60Hz for lower resolutions such as WQHD and Full HD. 12-bit includes an additional 2-bit dithering stage added by the monitors scaler.
Features and aesthetics
The monitor has a homely-looking square design. The stand base is a rectangular ring, matte black plastic with a brushed texture. The bottom bezel is matte black plastic, ~15mm (0.59 inches) thick with just a sliver of panel border. The top and side bezels are dual-stage, including a slim panel border flush with the rest of the screen and a slim hard plastic outer component. Including both components the bezels are ~6.5mm (0.26 inches) at the top and ~7.5mm (0.30 inches) at the sides. The screen has a light to very light matte anti-glare finish, explored shortly.
The OSD is controlled by a joystick at the rear of the monitor, towards the right side as viewed from the front. A small pinprick-style power LED faces forwards towards the right side of the bottom bezel. Glowing a fairly gentle white when the monitor is on and flashing white when it enters a low power state. The following video runs through the menu system and OSD controls, including the 2-device PiP and PbP functionality.
From the side the monitor is slim at thinnest point, ~14mm (0.55 inches). The monitor bulks out lower down where the stand attaches. The included stand offers tilt (5° forwards, 20° backwards) and height (100mm or 3.94 inches) adjustment. At lowest stand height, the monitor sits ~26mm (1.02 inches) above the desk surface with the top of the screen ~393mm (15.47 inches) above the desk. The total depth of the monitor – including the integrated cable tidy feature at the back – is ~233mm (9.17 inches), with the screen sitting ~80mm (3.15 inches) back from the front edge of the screen. So you can place the screen reasonably close to the wall if you want.
The rear of the monitor makes extensive use of matte black plastic. The stand attaches using a quick release mechanism, detachable by pushing up a switch beneath the attachment point. This reveals 100 x 100mm VESA holes for alternative mounting. A K-Slot is located beneath the OSD joystick, to the left. The ports are found towards the right in a recessed area and include; DC power (external ‘power brick’), HDMI 2.0, DP 1.2a and a 3.5mm audio output. The ‘E2UAE’ model includes 4 USB 3.2 ports (yellow coloured supporting BC 1.2 fast-charging) plus upstream. It also includes 2 x 3W backwards-facing speakers near the bottom of the screen. These offer basic sound output, with reasonable volume but not a particularly rich or crisp sound. A bit fuller than the output of some integrated speakers but far from the best we’ve heard. The ‘E2E’ model includes an additional HDMI 2.0 port but offers no USB functionality or integrated speakers. In some regions a 288E2A variant is available with tilt-only stand, 2 HDMI 2.0 ports, an audio input and speakers but no USB ports.
3840 x 2160 @60Hz can be leveraged using suitable versions of HDMI and DP. Adaptive-Sync is supported via AMD FreeSync (HDMI and DP) and Nvidia’s ‘G-SYNC Compatible Mode’ (DP). A power cable and adaptor plus HDMI cable is included as standard. A DP cable is also included with the ‘E2UAE’. Additional accessories depend on region. The first image below shows the refresh rates supported for the native 3840 x 2160 (‘4K’ UHD) and indeed lower resolutions including 2560 x 1440 (WQHD) and 1920 x 1080 (Full HD) when using DisplayPort. These refresh rates are also supported for the ‘4K’ UHD resolution via HDMI – they’re categorised in the EDID of the monitor as ‘PC’ resolutions. 60Hz but not 30Hz is listed for WQHD via HDMI. Additional refresh rates are supported via HDMI and categorised in the EDID as ‘TV’ resolutions. Nvidia Control Panel lists these as ‘Ultra HD, HD, SD’ and they can be accessed by other devices such as the PS5 and Xbox Series X. The second image shows these for the ‘4K’ UHD resolution and the third image for the Full HD resolution.
Calibration
Subpixel layout and screen surface
The image below is a macro photograph taken on Notepad with ClearType disabled. The letters ‘PCM’ are typed out to help highlight any potential text rendering issues related to unusual subpixel structure, whilst the white space more clearly shows the actual subpixel layout alongside a rough indication of screen surface. This model uses a light to very light matte anti-glare screen surface. This offers reasonable glare handling, whilst offering fairly direct emission of light. There isn’t a clear layered appearance in front of the image, whilst vibrancy and clarity is better maintained than on stronger matte surfaces. In brighter conditions, light striking the screen surface can give a ‘glassy’ look when observing some content. But the glare handling is far superior to a glossy surface or even lighter matte screen surfaces. The screen surface texture is not as smooth as it could be, giving lighter content a bit of a grainy look. Not the sort of heavily sanded look we’ve seen on some models, but not the smoothest look either. Most users should find this level of graininess fine or simply not really notice.![]()
As shown above the standard RGB (Red, Green and Blue) stripe subpixel layout is used. This is the default expected by modern operating systems such as Microsoft Windows. Apple’s MacOS no longer uses subpixel rendering and therefore doesn’t optimise text for one particular subpixel layout to the detriment of another. You needn’t worry about text fringing from non-standard subpixel layouts and won’t need to change the defaults in the ‘ClearType Text Tuner’ as a Windows user. You may still wish to run through the ClearType wizard and adjust according to preferences, however. The subpixels are quite ‘squat’ with relatively large gaps above and below. On some models this contributes to ‘static interlace pattern artifacts’ and can affect text and fine-edge clarity. On this model we observed no such issues, likely as the pixel density is so high that the gaps above and below the subpixels are still tiny. We therefore had no subpixel-related concerns related to sharpness or text clarity on this model.
Testing the presets
The 288E2UAE (288E2E) features a range of ‘SmartImage’ presets; ‘FPS’, ‘RTS’, ‘Gamer1’, ‘Gamer2’, ‘LowBlue Mode’, ‘EasyRead’ and ‘SmartUniformity’. Many of these presets simply adjust various settings in the OSD and don’t achieve anything you couldn’t achieve yourself with manual adjustment. A notable exception is ‘SmartUniformity’, explored here alongside a range of other manual adjustments. And ‘Easy Read’ which turns everything greyscale. All presets except ‘Easy Read’ and ‘Off’ unlock the ‘SmartFrame’ feature which allows a section of the screen to be highlighted with different digital brightness and contrast levels. The ‘Gamer 1’ and ‘Gamer 2’ presets allow full flexibility and allow you to easily recall different sets of settings. We touch upon the presets briefly in the OSD video but for this section will mainly be focusing on various manual adjustments, the ‘LowBlue Mode’ settings and the ‘SmartUniformity’ setting. The table below includes gamma and white point readings taken using a Datacolor SpyderX Elite colorimeter. General observations on the image are also provided.
Our test system uses Windows 10 and an Nvidia RTX 3090 connected using a DP cable. Additional testing was performed with an AMD Radeon RX 580 and also using HDMI, but our observations on this table were not significantly affected by this. An important step also had to be performed in the graphics driver if connected to an Nvidia GPU via HDMI. The colour signal had to be corrected to a ‘Full Range RGB’ signal as detailed in this article. No additional monitor drivers or ICC profiles were specifically loaded. The monitor was left to run for over 2 hours before readings were taken or observations made. Aside from our ‘Test Settings’ where various adjustments are made, assume factory defaults are used. An exception was that we disabled ‘DPS’ (Dynamic Power Saving) for consistency, a setting which dims the screen slightly when mostly dark content is displayed. When viewing the figures in this table, note that for most PC users ‘6500K’ for white point and ‘2.2’ for gamma are good targets to aim for. Individual targets depend on individual uses, tastes and the lighting environment, however.
Return and Refund Policy:
Please refer to website.
No reviews
Related Items


19872
Active listings407
Items sold